Tuesday 28 April 2015

The foundry is built


Project of the week is making a firebox suitable for a foundry that can be used to cast brass, bronze, or aluminium. .. and with a bit of elbow grease, the foundry has been built.

A refractory lining made of equal measures plaster of paris and sand has been used to line a 12 litre galvanised steel bucket.


The process is reasonably simple, although I'd recommend thinking twice and acting once in most cases as having to think and act at the same time can prove difficult.  I'd mostly planned the build and it went mostly to plan so I'm considering this a success.

Having not mixed plaster by hand before I will confess some initial concern that I'd make a lumpy mess that wouldn't be a smooth mix by the time it started to harden, but within 5-10 minutes it was smooth enough that I couldn't feel any lumps with my fingers and I decided it was time to pour.

The centre space for the fire was formed easily enough and with only a little fuss and bother, and the mix solidified up reasonably quickly once its fifteen to twenty minutes was up so all in all the timing was pretty good.

The finished product, or about as finished as it'll get tonight.  My reservation is that I should have made more lining material so that the firebox is deeper. I'd want it higher up the sides and deeper on the base.


The measurements looked good on paper, and I did a test run with water to work out how many measuring buckets of water fill the steel bucket. So I expected the volume of the lining to be spot on, but the drymix doesn't pack like water and the overall mix was about 30% smaller that I'd expected. The lesson learned, of course, is that I can afford to mix too much and tip some away but not having enough is a bit of a pain.

The firebox looks large enough to get a good charcoal burn and well big enough to work on small projects like tools or knives.

The mix stays butter soft for a long time, and I was in too much of a hurry to get the holesaw out and get the blast hole cut. Next time - if there is a next time - I'll be happy to wait a half hour or so before cutting. The steel is pretty thin and offers little resistance, and while you want to cut the mix quickly I didn't have to put myself in a rush to do it.

More news as it breaks, but with the bank holiday approaching I should be able to fire this up and see how it performs.

Wednesday 22 April 2015

Proper Preparation and Planning


Preparation and Planning
While I'm not getting much project time in at the moment, I'm not wasting the time I have in proper preparation and planning.

The first working fire is about to be built - I've got sand arriving tomorrow that I'll need for the refractory mix and I need to buy a hole cutter to make the blast so I should be able to go out this weekend and if the weather holds I'll put it all together.

My first working fire is a foundry that I'll repurpose for some hot metalwork. It'll be fine until I can build something bigger, and will let me make cast brass components that I may well need soon. To this end I also caved in and ordered a graphite crucible online, I think I'm going to make a steel one when I can but having "That crucible problem solved" for now is going to mean I can get stuck in.

I'm going to use a cheap air blower from an outdoor ship and see how hot the fire gets. Long term I've got plans for a peltier effect module to power the fan from the fire. But the first step is putting a blower on there and getting a feel for how much air it needs to get a good burn.

Patio Paving
After making a few sketches and standing in the space, I'm pretty much sold on a patio space 15" wide and 18" deep, with two benches and a circular firepit around 3" in diameter.  This second firepit will be mostly for heat and show, but I want to be able to cook on it so a good first project for the working fire will be making a rotary spit.

Practical Project
The rotary spit will start as a simple A-Frame and crank handle, but if I want to spend two hours cooking a chicken I'm going to need to automate that rotation and the blog comes full circle to Roger in Technology.

Presenting Peltier 
The three engines I'm considering are all quite different in their construction and maintenance, and each with its pros and cons. The first is to use it as an excuse to make a peltier generator, which is a remarkably good project to start now, especially if I want to use it to power a fan later on.
The simple construction is a metal squarebar with a peltier device and heatsink on. The squarebar can be staked into the firepit at an angle, with the heatsink off to the side. And then I'll run an electric motor on a belt drive to turn the spit.

The peltier solution is nice, but it'll be difficult to get much current without a reasonably large array of peltier effect generators and a large heatsink. I don't know how much current I need to generate the torque to rotate a chicken. In fact, I don't even know how much torque you need to rotate a chicken so I could test this with some 9V or 4.5V DC motors and see if they are likely to be up to the task.

Piston Power
While the peltier might not work, the age of steam has me covered. I know I can build a steam engine with a boiler I can place in a cooking fire that will have much than enough power available - so specifically I can build a very small steam engine that will do the job.

It's a little fiddly to have a steam boiler in the fire with brass pipes leading to a steam regulator and crankshaft setup. My concern is that I have two unique units connected by brass pipes, and the pipes will bend and break.

The next option here is an external combustion Stirling engine. Relying on the expansion and compression of the working fluid, the stirling could probably be a single unit. Like the others it would sit on the edge of the firepit. Its probably harder to construct than the steam, but doesn't need as much pressure in the boiler and feels like a safer bet.  I find the stirling a more interesting design, and it should be very easy to maintain and run - needing little tending compared to the steam that might need me to look after the boiler.

Practical problems
Whatever the build, I need something that is easy to store. Its not going to live in the elements all year round, so I want something I can easily carry from the firepit and stow away to cool once the cooking is done.

Thanks for reading everybody, I know this wasn't really an action report and I don't have any pictures.  I'll get some pictures of the gear and the space before the build starts.

This blog was brought to you by the letter "P".

Wednesday 15 April 2015

Firepit, Foundry and Forge.


Progress report on the technological terror I am creating.  This year, I'm in hardware mode instead of software.

Hardware this year doesn't mean valve amps and videocards, instead I'm going back a few thousand years and starting with the basics.  Aside from land clearance in the garden, the first construction is about to start - although land clearance and gardening is more challenge than you'd think.

Dakota Firepit
The first thought was to dig a dakota pit, and since I've uprooted some hedges I had a good starting hole to use that I've spent some time looking at.
The Dakota pit is a low-tech solution that I could build with stone age tools, and while I don't have any stone age tools I'm willing to improvise. It'll be enough to heat and beat some metal, and is a good cooking fire too.
I think I can get good airflow from a simple 12V DC brushless fan using an old chimney pot to duct air inwards, so I could upgrade the Dakota pit to get more heat and be a temporary forge fire. This blend of stone-age and modern technology pleases me.

However, the Dakota pit isn't a very visually appealing structure - its a hole in the ground full of fuel and ash at best - and at worse looks pretty naff. Ok, I'll be adding an electric chimney but it's still a hole in the ground. Rain will get to it too.
Its also fundamentally a floor pit which isn't a good height to work at. I'm not going to knock it - as a practical survival fire its amazing but for a domestic garden I can afford to go upmarket so I've been searching for practical alternatives.

Brake Drum Forge
The height of the Dakota pit is annoying, so I'm looking for a raised firebox at about waist high. Being portable is an advantage here because i'll be forging outside, but I'm going to want to store it in a shed to keep it safe from the elements.  Once I've built a forge house I can have a more permanent set-up, but I'm looking at getting started straight away so want something small.

A Brake Drum forge is easy to build, the parts are basically scrap metal and its reasonably portable. brake drums are galvanised, so can give off some fumes but I'll be outdoors and can probably deal with it. It's small, portable, and cheap and brake drums are the starting point for many blacksmiths.

Foundry
While the brake drum forge is probably the best starting project, there are some restrictions on its construction.  A Dakota pit can be dug with stone age tools that I could make myself, while a brake drum forge needs cutting, welding, and tooling.  Normally, practicing these skills is a great task but I want to avoid spending money on gear.  Also, the brake drum forge still makes your garden look like a scrap yard. There are also fumes from a brake drum and I'm not too into that.

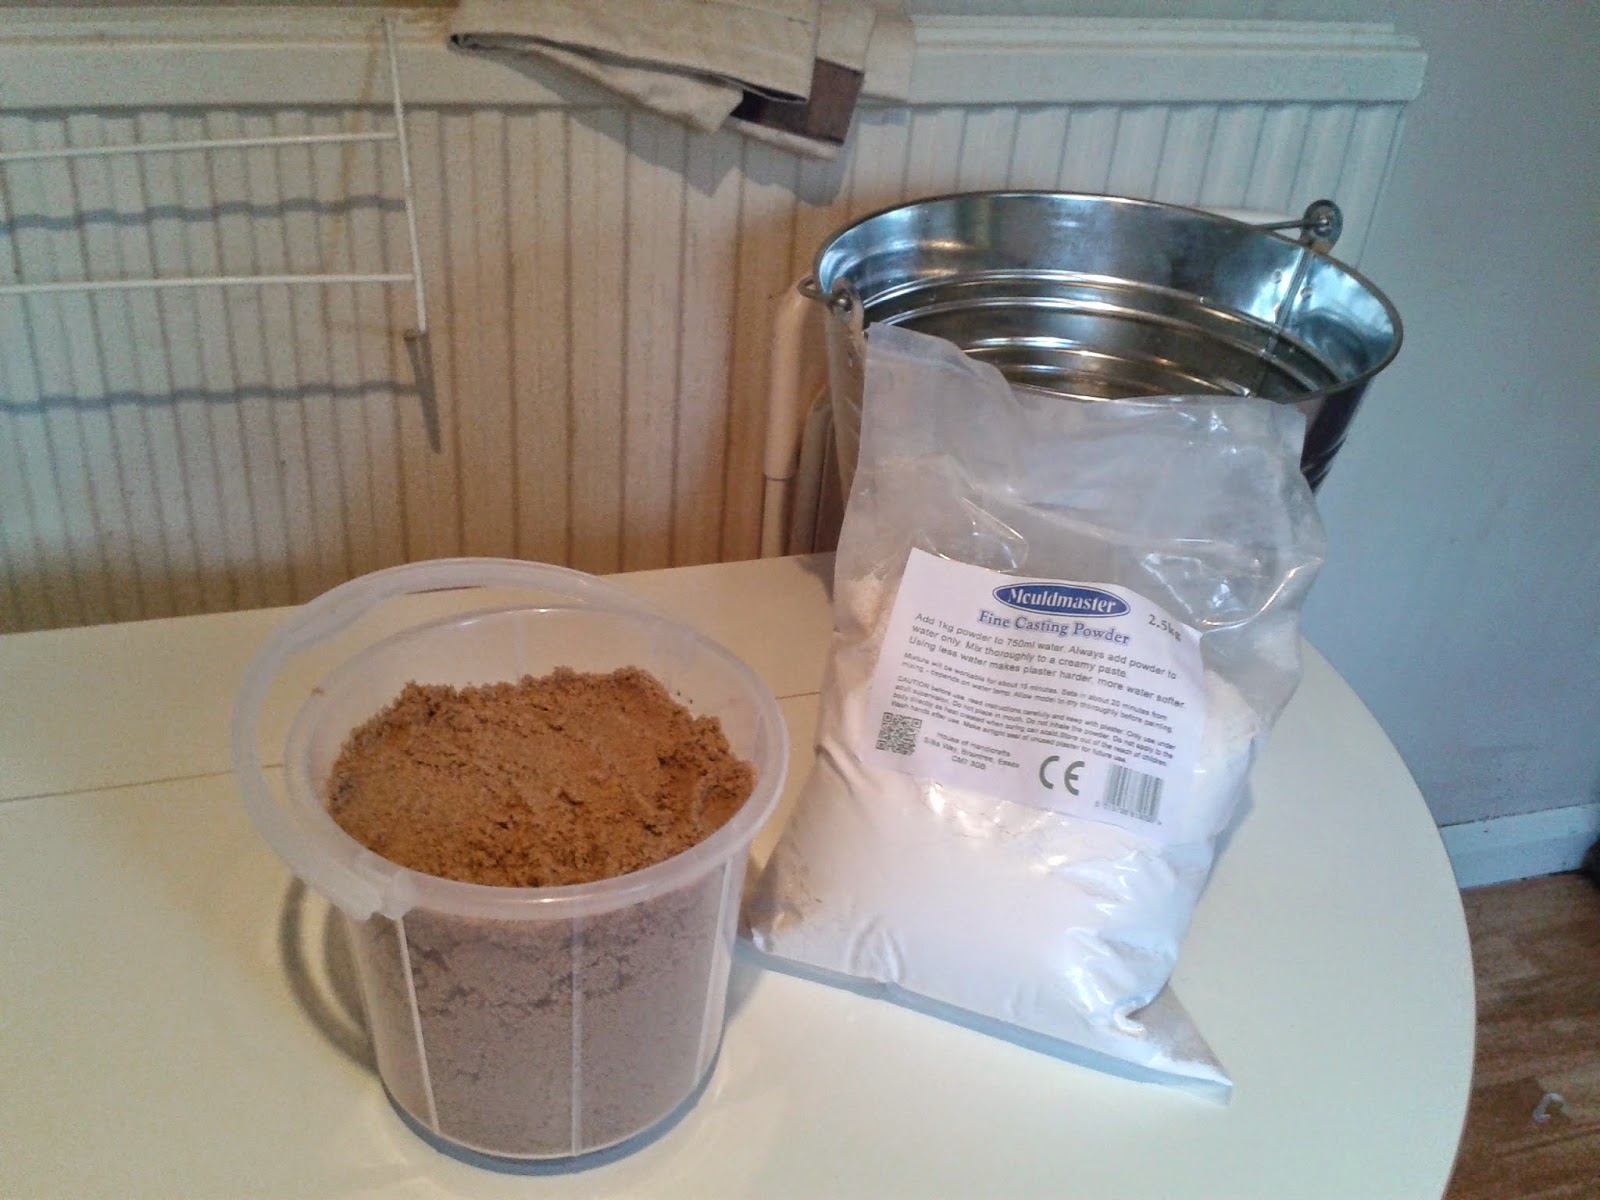
The compromise is to make a storm-in-a-teacup, on this case a foundry-in-a-bucket.  I've got a twelve litre steel bucket - two and a half gallons - that I'm going to line with a refractory material and use as a blast furnace. With an air intake about halfway down I can use the same brushless 12V DC fan that'll get me between 30 and 50 cfm of airflow.  With 30 MJ/KG fuel I can get a thousand degrees in there and enough to liquidise brass.

Because the unit is contained in a bucket, it's super portable. It'll weigh in under 10 kilos (20lbs) and can be placed on a stand for working metal, or on the ground for stability if I'm heating a crucible.

Projects
I've got a few early projects in mind.  The foundry is one of the first milestones, and I should be able to 3D print patterns to make greensand molds from and cast shapes from brass. I'll have sand left over from making the refractory lining, and thats the principal ingredient in making casting sand.

Using it as a forge I should be able to make some fire tools, and a combination of cast parts and worked steel will make a rotisserie which will allow me to repurpose the whole thing as a cooking fire in time for BBQ season.  I guess I'll have to run the fire cooler for cooking - I'm not sure the melting point of chicken, but I'm pretty sure that a thousand degrees blast furnace will result in "well done".

The bucket foundry should be enough to work small steel and iron - tools, and some misc stuff. I'll be making nails with it for some woodwork projects. Kitchen hooks, bookends. Stuff.
It *might* be good for making chain, but there are complications and TBH I don't need any chain right now.
It'll be good for making knives, too, although I'll need a serious grinder for materials reduction and knives are a lot of work so its not a project to be taken lightly. There is a defunct lawnmower, so I'm thinking of taking the blade off and making a gardening machete from it. Reduce, Reuse, Recycle.

So overall, I'm hoping to get good use out of the bucket foundry. Pictures and videos are on their way.
Until then, Fly Casual.

Monday 6 April 2015

Can I axe you a question?


Today was an axe day, destroying the garden - uncovering & discovering a large Mahonia trifoliolata which put up a fight with its super spiky spikes of vengeance.

Only afterwards did I learn that its edible berries ripen in the spring, and can be used to produce wine or as a fruit drink. Damn, had I known I would have left it standing until harvested.  Possibly I was distracted by the amazing bright yellow wood, which I'll keep, season and hopefully make something out of. But dang, I could have had some tasty berries.


Nonetheless, everything at the back save some unidentified reeds and the shed had been cut down and they are next. We don't have a key to the padlock on the shed, but its exterior construction is a wood that will not survive my industrious axework and it won't last once I focus my attention on it.   If it wasn't for the fact that everything has been chopped down, I'd be shopping for a bigger axe right now.


The wood I've collected isn't enough to make the benches from but I'll make a logpile and it'll feed the firepit on a summer evening. There is a tree that I've got my eye on, that might have to come down and then I'd be really tempted to make a bench from it rather than firewood.

The base on the shed isn't all that - Its bordered by pavers and to be honest I don't expect to uncover much more. So now I've got an 18x25 foot space - once the shed is cleared and the ground is dug - to build the forgehouse and patio space. The Forgehouse looks like around 9x15 foot or therabouts, with space for stock, fuel, hot and cold workbenches and all the regulars and comes in under the planning permission radar as long as a few simple checkboxes are ticked. It has to be non-combustable, but I was planning that anyway, and it has to have a decent floor and not have a bed in it. Also, 2.5M eaves and a 4M pitch, but those are way bigger than I need so it should be a breeze.

The hot workbench will be commercial firebrick on a sand base, and hopefully suitable for casting brass and other soft metals. The cold workbench will just be a thick wooden worksurface with a decent vice.

Meanwhile the patio has space for probably three benches, or two benches and a gazebo, and a firepit around three or four foot in diameter. This will be an earth or sand base for wood and charcoal burning, and I guess cooking over. This needs a plan. For all I know at the moment, I have a square space around 18x18 foot and want to have at least a bench and a firepit.

So plans are coming together. The base and patio are going to cost around three grand if I get contractors in, probably more given there is little to no access to the rear of the garden.  I can do it myself for around 750-1000 looking at the materials cost, or around half that for cheap ass paving, and I'm torn between just waving a wand and having somebody do it while I'm at work or plugging away at it with flesh, blood, sweat and tears.

Materials for the forgehouse are expensive in this part of the world, and I've got to choose between stone and brick which may end up being a very very difficult decision. The firebox, anvil and forge tools I need are cheap enough and everything beyond the basics I can make once there is a fire going.

It's a huge plan. Its a grand design. Its a lot of work. I'm starting to feel that this year will be the groundwork and learning year and the construction might not be finished until after the winter.